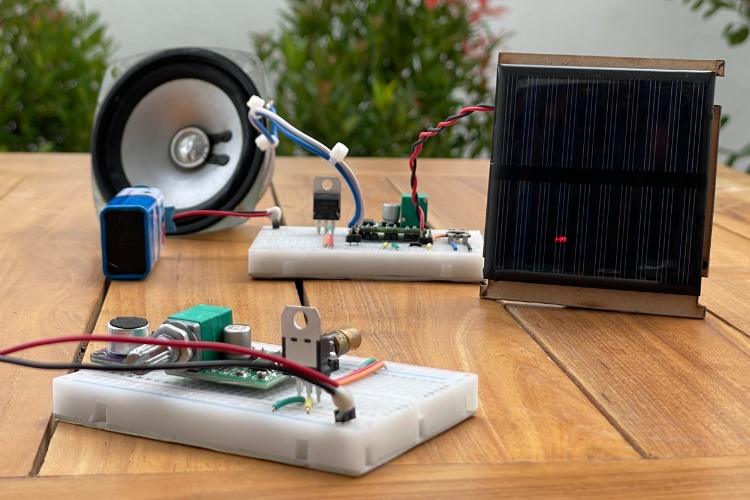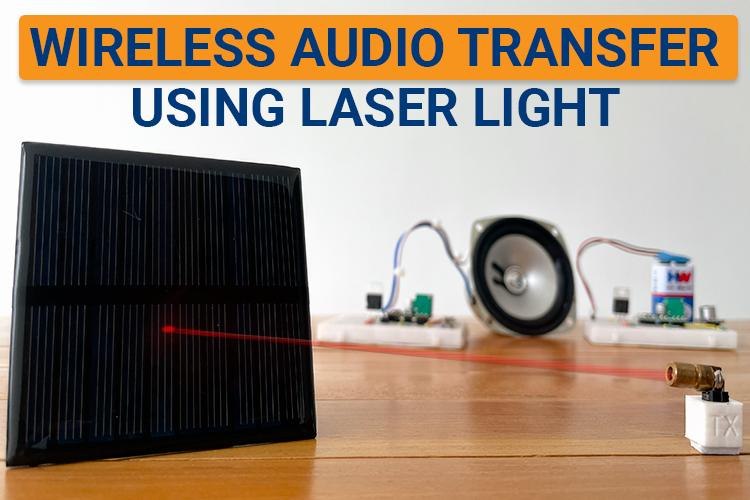
In this article, we are going to discuss how to transfer audio through laser light. This is a fun little project and the concept is similar to what we see in fiber optics cable, we will use a laser light to send data from one point to another. To be particular, in this project here we are going to transfer our voice from one point to another by shining a laser light on a solar panel. This is made possible by Light Fidelity or (Li-Fi) in short, for those who are new Li-Fi is a technology in which data can be transferred using light, in our case we sending our voice as data and using Laser as light source.
The highlight of this project is its simplicity, you can easily build this over a weekend with commonly available components. If you are interested in Li-Fi you can also check our our Li-Fi Text communication and Li-Fi audio transfer projects.
So, without further delay, let’s dive into building the project.
How to transfer Audio using Laser Light?
Transmitting Audio via Laser light is simple than it sounds. On the transmitter side we have a microphone which converts our voice into electrical signals, this signal then amplified using an audio amplifier and the output of this amplifier is directly connected to a LASER diode. This light is then pointed towards the solar panel on our received circuit. Agian, on the receiver side the solar panel is connected as audio input for another audio amplifier which amplifies these signals and plays it on a speaker. All of this works because of the ability of light to carry data.
Transmitter Side
Audio to Electrical Signal:
Our aim is to transfer the live audio signal, so in that case, we need some sort of microphone to convert the audio signal to an electrical signal. Actually, speaking, there comes a little bit of a complex circuit to achieve a perfect output. So, to make it simple, we are going to use the MAX4466 Microphone Amplifier Module, you can check out the link if you want to know more about this microphone module.
Above, you can see the GIF video representing the working of the MAX4466 Microphone Amplifier Module. Now we have the electrical signal that needs to be transmitted over the laser.
Electric Signal to Laser Beam:
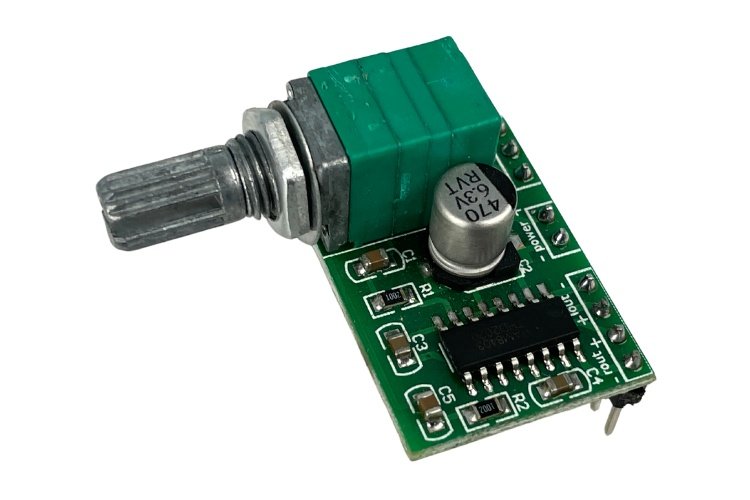
In the above process, we have received the electrical signal. Now this electrical signal is used to drive the laser light beam. It can be done using multiple ways, like using some analog circuits (i.e., switching MOSFET). But to make it simple and more effective, we are using a Mini 5V Audio Amplifier Module based on PAM8403, as you can see in the image below.
The reason behind choosing this is simple. It works in the 5V range, so it can be easily integrated with the MAX4466 Microphone Amplifier Module. It also has an inbuilt potentiometer to adjust the amplitude of the output, and more importantly, it is more affordable. You can use whatever amplifier board you have or even create your own circuits to do the job right. Still, I suggest using the audio amplifier board for better output and hassle-free work. We have previously used the PAM8403 to also build a simple DIY Bluetooth speaker, you can check that out if you are intrested.
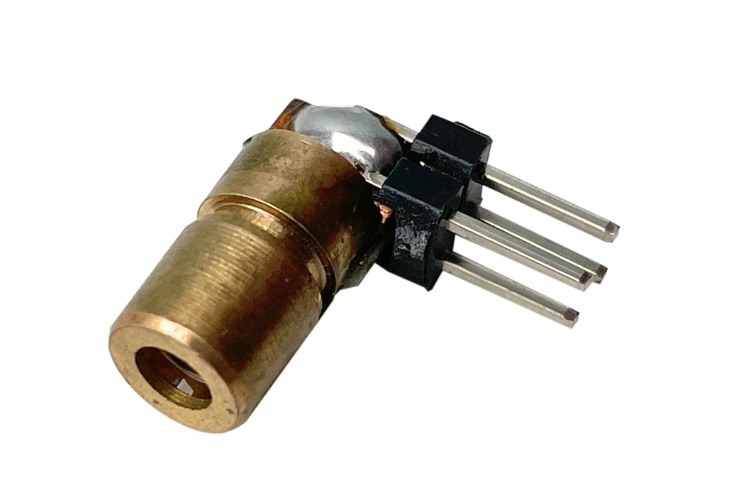
Now, a laser diode can be connected to the output of the PAM8403 module.
Above, you can see the laser diode we are using. If you would like to reduce the current fed to the laser, you can use a resistor of minimum value. Here, the laser we are using has a built-in 30-ohm resistor in series with the power input. If you feel like reducing the power, you can do so by adding an extra resistor in series or even adjusting the potentiometer in the PAM8403 module.
Receiver Side
Laser Light to Electrical Signal:
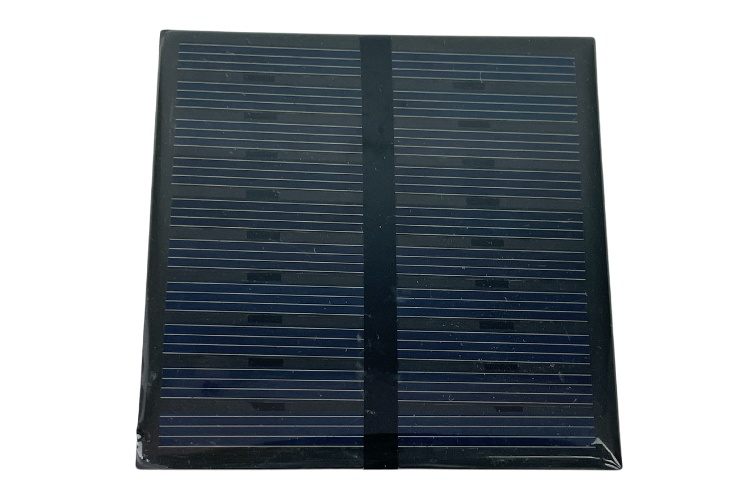
As in the last step we have already completed the transmitter side, here we go with the receiver side. So the primary process is to convert the audio signal from the laser light beam to its original state of electrical signal. Here, generally, we can use any light-based sensor (i.e., LDR, photodiode, etc.) to do the job right, but those with smaller reception areas are quite tough to use. However, they are not unusable; you can even use them. But here in this project, I am going to use a larger array of photodiodes, which is also known as the solar panel.
I am going to use a small toy solar panel. Despite its minimal power output, it is more than enough for our project. So, by using this solar panel, we are going to convert the laser beam to an electrical signal.
Electrical Signal to Speaker:
The electrical signal from the solar panel cannot be directly fed to the speaker due to its low power output. Even with a larger solar panel, the small point of light hitting the panel doesn't make a significant change in the output; we will only get a higher DC voltage with a larger panel. However, we need an analog voltage.
To solve this issue, I am going to use the same amplifier module that we used on the transmitter side so that the output electrical signal can be effectively amplified and passed to the speaker.
Regarding the speaker, you can use any speaker compatible with your amplifier module. I am using a 4-ohm, 10-watt speaker, as shown in the image above.
Therefore, we have successfully completed the theory part. I hope you all understand the main concept behind choosing the components and the workings of the project. So, let’s move on to the hardware part of the project.
Components Required for Wireless Audio Transfer Using Laser Light Project
Below is the list of required components to build the Wireless Audio Transfer using a laser light project. Some components may have alternates. To learn more about that, read the “Concept of Audio Transfer Via Laser - Explanation” available above.
Solar Panel - x1
Laser Diode - x1
Resistor (30 ohms) - x1
Potentiometer (100k) - x1
Speaker (4 ohms, 10W) - x1
PAM8403 Audio Amplifier Module with Potentiometer - x2
9V Battery - x2
BreadBoard - x2
Jumper Wires - Required Quantity
Circuit Diagram of Wireless Audio Transfer Project Using Laser Light
Here this project is built by keeping in mind that to make it easy and use only Minimal components. So, as an outcome, the circuit is simple for Everyone to understand and recreate.
Transmitter Part:
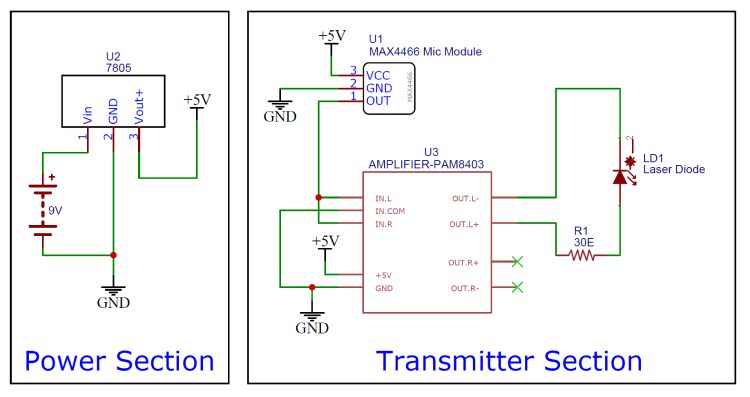
Here you can see the Schematic of the transmitter part. Those connections are self-explanatory.
We can split the schematic into two parts: The power and Transmitter Section.
Power Section:
Here, the power source selected is a 9V battery. Since the rest of the circuit operates at 5V, I am using a 7805 5V Linear Voltage Regulator to effectively convert 9V to 5V.
Transmitter Section:
In this section, only four components are being used.
Both the MAX4466 and PAM8403 modules are powered using the 5V output from the voltage regulator. The output of the MAX4466 Microphone Amplifier Module is connected directly to the PAM8403 Audio Amplifier Module.
The PAM8403 supports 2 channels. You can use one channel alone or use both channels as I have. However, we are going to drive only one laser. The laser's positive and negative terminals are connected in parallel with one of the channels. While connecting, I have mentioned using a 30-ohm resistor in series. This is for limiting the current flowing through the laser diode. If you are using the same laser diode as me, this resistor is not needed as it already has a 30-ohm resistor connected internally.
Receiver Part:
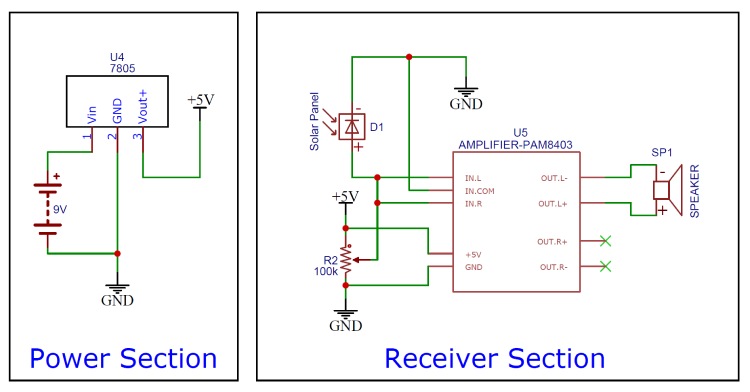
Below you can see the schematic of the receiver part. You might notice a similar power section here like the transmitter part, as our requirement is still the same. We are powering the system using 5V.
Receiver Section:
Here, the solar panel’s negative side is grounded, and the positive side is connected to the input of the PAM8403 Audio Amplifier Module. Like the transmitter, I kept both input channels connected. An extra step is applying the bias voltage to the input using a potentiometer, which sets the DC offset to the input of the amplifier. Finally, a speaker is connected to the output of the PAM8403 amplifier module.
That completes our circuit. Next, let us move on to the assembling part.
Building the Circuit
Let's build the circuit according to our schematic. I am using a breadboard to assemble all the components.
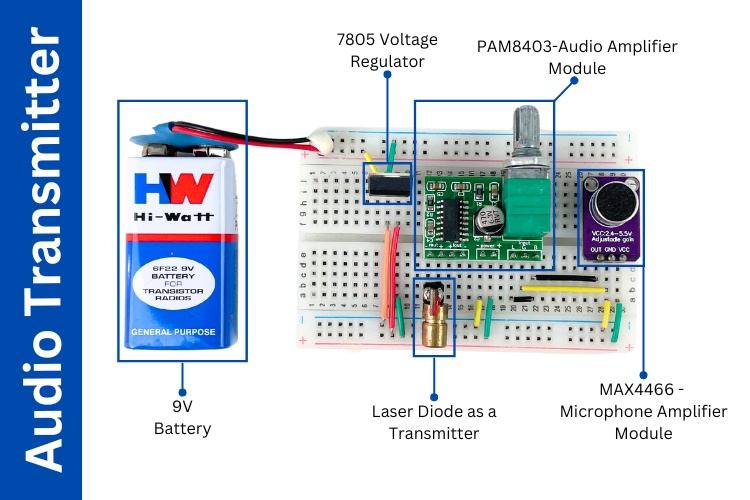
Above, you can see the assembled image of the transmitter with its parts marked for your reference. The laser diode is directly soldered to a 2x2 Berg strip connector, allowing it to be easily fixed to the breadboard. Similarly, the battery connector is also fitted with a Berg strip for easy breadboard integration.
In this transmitter, there are two configurable areas. One is the gain adjustment in the MAX4466 Microphone Amplifier Module, which controls the sensitivity of the microphone. The other is the amplitude adjustment in the PAM8403 module, which controls the output power to the laser diode. These configurable options allow for precise signal control.
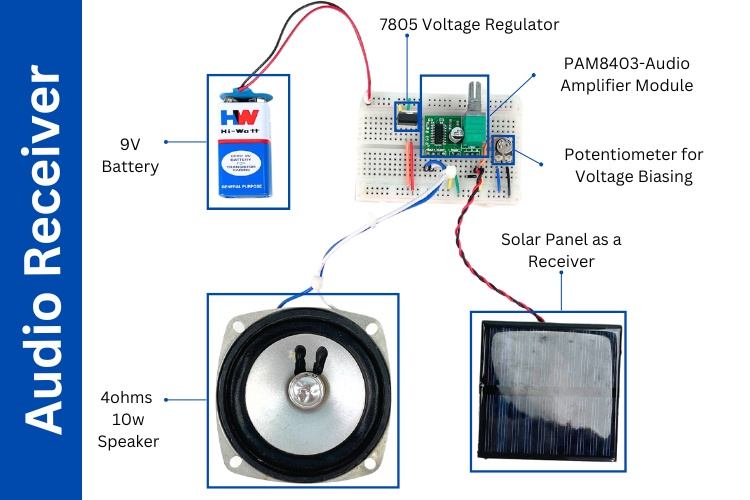
Above, you can see the assembled image of the receiver. Parts like the speaker, solar panel, and battery are connected to the breadboard using Berg male strips, which I have soldered to the wires and fixed to the breadboard.
Like the transmitter, the receiver also has two configurable options. There is a potentiometer connected to the input of the PAM8403 module, which is used to set the DC offset to the input signal. The PAM8403 module itself has a potentiometer to adjust the amplitude of the signal going to the speaker, effectively allowing volume adjustment.
With this, we have completed building the circuit as per the schematic diagram. Next, Working demonstration.
Working Demonstration of the Wireless Audio Transfer Project
After successfully assembling the components, we began testing the project. It works well both indoors and outdoors, regardless of the conditions. The range of the wireless transfer is impressive, as the intensity of the laser does not diminish significantly under clear weather conditions. As long as the laser beam hits the solar panel, the audio is transferred seamlessly. We also tested the setup from multiple angles and encountered no issues.
The image above was taken while testing the setup outdoors. Unlike other projects, I did not include any GIFs to show the working process, but we have made a video that you can watch below. The video provides a complete demonstration and explanation of the project.
Some of the Improvement Ideas & Additional Possibilities for this Wireless Audio Transfer Project
These are some of my ideas for extending this project, which you can give a try.
Improvement ideas:
Use a more sensitive photodetector instead of a toy solar panel, such as an avalanche photodiode (APD), to improve the reception quality and range.
Implement a focusing lens system to concentrate the laser light on a smaller, more sensitive area of the photodetector.
Introduce noise reduction techniques and filters to improve the audio signal quality.
Some sort of Automatic Alignment System to ensure optimal signal transmission even with movement or misalignment.
Additional Possibilities:
Expand the project to support bidirectional communication by incorporating a similar setup on both ends, allowing two-way audio transmission.
Adapt the system to transmit not only audio but also other types of data, such as digital signals for internet communication, by incorporating appropriate modulation techniques.
Experiment with different laser wavelengths and power levels to extend the effective range of communication, ensuring long-distance transmission capabilities.
Design a compact, battery-operated version of the system for portability, making it suitable for mobile and field applications.
Frequently Asked Questions
1) Can we use laser in Li-Fi?
Of course, you can use lasers in a Li-Fi system. Practically, any light source along with its sensor can be utilized to create a Li-Fi system.
2) Is LiFi Better than Wi-Fi?
Determining whether Li-Fi is better than Wi-Fi depends on various factors. Both have their own pros and cons. For a detailed explanation, visit our article LiFi vs WiFi.
3) Is LiFi Safe for Humans?
Yes, LiFi (Light Fidelity) is generally considered safe for humans due to its Non-Ionizing Radiation, Low Power Levels, Limited Range, etc. Overall, LiFi is a promising and safe technology for wireless communication, offering a secure and efficient alternative to traditional radio frequency-based systems.
4) Advantages and Disadvantages of LiFi?
Advantages of Li-Fi
High-Speed Data Transfer: Li-Fi provides exceptionally fast data transfer rates, often surpassing those of traditional Wi-Fi, by utilizing visible light.
Enhanced Security: Since light cannot pass through walls, Li-Fi offers better security against unauthorized access compared to radio frequency systems.
No Radio Frequency Interference: Li-Fi avoids issues related to radio frequency interference, making it suitable for environments sensitive to such interference.
Reduced Latency: Li-Fi can achieve lower latency compared to Wi-Fi, benefiting applications requiring real-time communication and streaming.
Energy Efficiency: Li-Fi can make use of existing LED lighting systems, which are energy-efficient and help lower overall energy consumption.
Disadvantages of Li-Fi
Line-of-Sight Requirement: Li-Fi needs a direct line of sight between the transmitter and receiver, which can limit its range and flexibility.
Limited Range: The operational range of Li-Fi is shorter than that of Wi-Fi due to its reliance on visible light.
Indoor Use Only: Li-Fi is mainly effective in indoor settings where light can be easily managed and controlled.
Light Obstruction: Any blockage or interruption in the light path can disrupt the communication, impacting reliability.
Cost and Infrastructure: Implementing Li-Fi may require higher initial costs and changes to existing infrastructure, such as upgrading to suitable lighting systems.
5) What is LiFi Used For?
Li-Fi (Light Fidelity) provides high-speed wireless communication by using visible light, ultraviolet, and infrared radiation for data transmission. It is employed in various settings, such as secure environments where radio frequency (RF) signals are restricted, including military and healthcare facilities. Li-Fi offers fast internet access and can be integrated with LED lighting systems to deliver both illumination and data transfer. It is advantageous in areas with high RF interference and is used to enhance applications like augmented reality (AR) and virtual reality (VR) with its superior bandwidth and low latency.
6) What is SLD Laser LiFi?
SLD (Surface Light Emitting Diode) laser Li-Fi refers to a technology that utilizes surface-emitting laser diodes to facilitate communication via light. Unlike traditional LEDs that emit light from a single point, SLDs distribute light over a larger surface area, which enhances the efficiency and performance of Li-Fi systems. In SLD laser Li-Fi setups, these laser diodes enable high-speed, high-bandwidth communication using visible light, offering faster data transfer rates compared to conventional LED-based systems. This technology is beneficial for applications demanding rapid data transmission and reliable performance, such as in urban environments and industrial contexts.
Projects in Similar Relm
1) Li-Fi-based Text Communication between Two Arduino
Demonstration of Li-Fi communication using two Arduino boards: text data is transmitted from an LED and a 4x4 keypad and decoded on the receiver side using an LDR. This showcases Li-Fi's ability to facilitate high-speed, optical data transfer.
2) Audio Transfer using Li-Fi Technology
In this project, we’ll build a circuit to transfer audio data using Li-Fi technology.

